

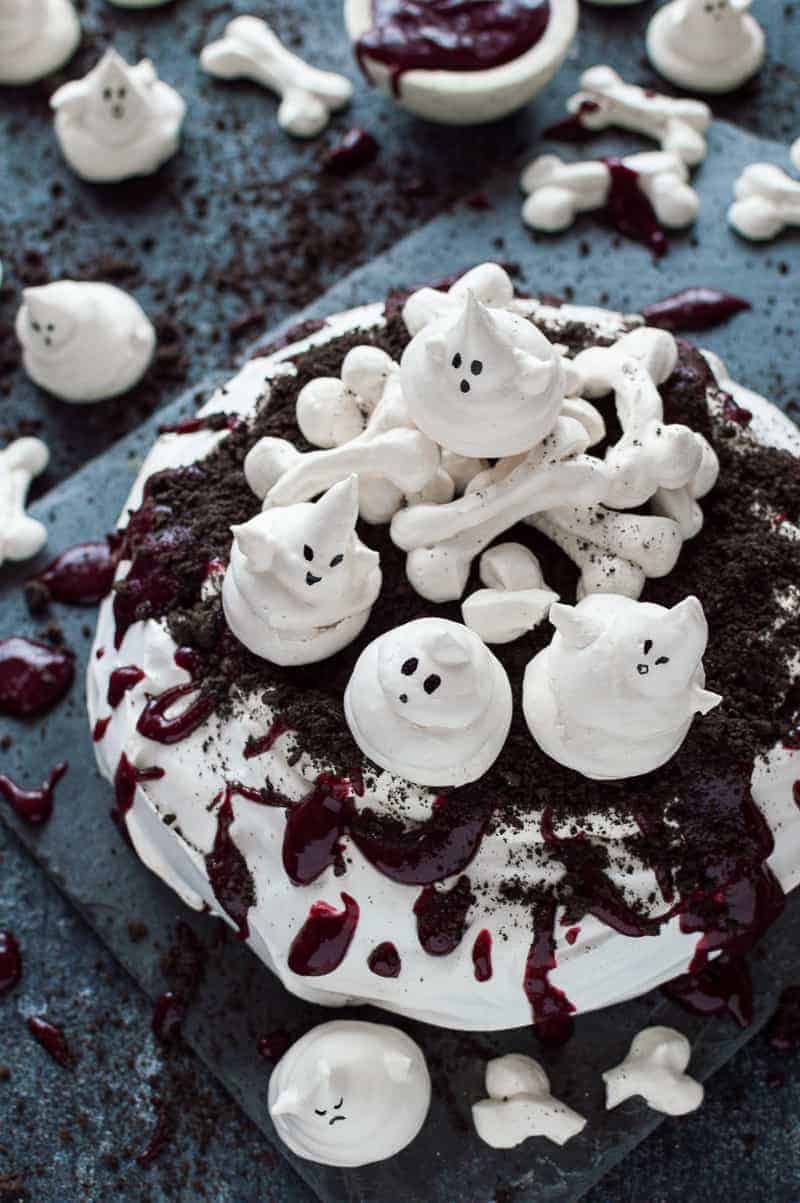
Halloween haunted pavlova - a spooky, impressive centerpiece with meringue ghosts and bones, Oreo soil and berry coulis blood; it is easier to make than you might think!

Now that we are firmly into October I figured that I should probably start sharing some Halloween bakes. I really enjoyed making (and eating!) this Halloween haunted pavlova, also known as 'The Haunting Of Anna Pavlova' - props to my cousin Maddy for coming up with that one!

It is a pretty simple concept - top a regular pavlova (crispy on the outside, marshmallowy in the middle and topped with whipped cream of course) with berry coulis 'blood', Oreo cookie 'soil' and some easy meringue ghosts and bones and you've got yourself an impressive Halloween showstopper.
The ghosts are very easy to make, you just pipe meringue in blobs that are fat at the bottom and tail off towards the top; you can use a toothpick with a little blob of meringue on the end to shape some arms if you like; then once they are baked use a fine, food-only paintbrush dipped in black gel food colouring to paint on the faces.
I tried to give them all different personalities but then I felt bad eating them...

Once the pavlova is assembled it ideally should be eaten straight away, but all of the components can be made in advance - the pavlova and meringue ghosts and bones can be baked, cooled and stored in airtight containers and the berry coulis can be made and kept in the fridge.
You can even crush your Oreos for the soil in advance too so that when it comes to serving it all you've got to do is whip some cream and put your toppings on (which only takes a minute).
More Halloween Recipes:
- Witches' finger cookies
- Chocolate glazed black cat doughnuts
- Mini bleeding heart Halloween cakes
- Chocolate blackberry gothic Halloween cake
- Meringue bone palace Halloween cake
- Jack-O-Lantern pumpkin pies
- Monochrome cake
If you tried this recipe why not tag @domestic_gothess on Instagram and hashtag it #domesticgothess
*All images and content on Domestic Gothess are copyright protected. If you want to share this recipe then please do so by using the share buttons provided. Do not screenshot or post the recipe or content in full.*
Halloween Haunted Pavlova Recipe:

Halloween Haunted Pavlova
Ingredients
Meringue Ghosts and Bones:
- 2 large egg whites
- pinch cream of tartar
- 110 g (½ cup) caster (superfine) sugar
- black gel food colouring
Pavlova:
- 3 large egg whites
- ⅛ teaspoon cream of tartar
- 175 g (¾ cup + 1 Tbsp) caster (superfine) sugar
- 1 teaspoon cornflour (cornstarch)
- ½ teaspoon vanilla extract
Berry Coulis Blood:
- 450 g (1 lb) mixed frozen berries
- 100 g (½ cup) granulated sugar
- 100 ml (scant ½ cup) water
To Finish:
- 200 ml (½ + ⅓ cup) whipping cream
- 1 heaped Tbsp icing (powdered) sugar sifted
- ½ teaspoon vanilla bean paste/extract
- 5 chocolate stuffed Oreo cookies or Bourbon biscuits
Instructions
Meringue Ghosts and Bones:
- Preheat the oven to 100C/210F/gas mark ¼ and line two baking sheets with baking parchment.
- Place the egg whites and cream of tartar in a large, spotlessly clean bowl and whisk on medium speed until soft peaks form. Gradually whisk in the sugar a couple of spoonfuls at a time until it is all incorporated; continue to whisk until the meringue is glossy and forms stiff peaks.
- Spoon the meringue into a disposable piping bag and snip off the corner. Use a little of the meringue to stick the baking parchment to the tray so that it is easier to pipe.
- Pipe bone shapes on one of the baking trays – start by piping a blob then work your way down to make the length, then finish with another blob on the opposite side. Repeat in reverse to make a crisscross, overlapping your meringue down the length of the bone to ensure there are no thin spots. It may take a few attempts to get the technique right.
- Pipe ghosts on the other tray - start with a fat blob and tail off towards the top. Use a toothpick with a blob of meringue on the end to form arms.
- Bake for about 1 hour until firm and the meringues lift away from the parchment cleanly. Remove from the oven and allow to cool.
- Once cool, use a fine, food-only paintbrush to paint faces on the ghosts then store in an airtight container.
Pavlova:
- Turn the oven up to 150C/325F/gas mark 3. Line a baking sheet with baking parchment.
- Place the egg whites and cream of tartar in a large, spotlessly clean bowl and whisk on medium speed until soft peaks form. Gradually whisk in the sugar a couple of spoonfuls at a time until it is all incorporated; continue to whisk until the meringue is glossy and forms stiff peaks.
- Sift over the cornflour and drizzle over the vanilla extract; fold through carefully until well combined.
- Dollop about ⅔rds of the meringue onto the baking sheet and spread it out into an approx 20cm/8in circle. Use the rest of the meringue to build up the sides so that it is sort of bowl shaped.
- Place the meringue in the oven and immediately turn the heat down to 100C/210F/gas mark ¼. Bake for 1 hour 20 minutes then turn off the oven and leave the pavlova in there until it has cooled completely (to help prevent it from cracking). Once cool, store in an airtight container.
Berry Coulis:
- Place all the mixed berry coulis ingredients into a medium sized heavy bottomed saucepan and bring to the boil over a gentle heat, stirring regularly. Reduce to a simmer and cook for about 15 minutes, or until thickened. Allow to cool, then transfer the coulis to a blender or use a hand blender to purée until completely smooth, pass the puree through a sieve, pushing through as much pulp as possible and discarding any seeds. Transfer to a jug, cover and keep refrigerated.
Assembly:
- When you are ready to serve the pavlova, carefully transfer it to a serving platter. Place the Oreos in a food processor and blitz until finely ground (or place in a freezer bag and bash with a rolling pin).
- Whisk the cream with the icing sugar and vanilla bean paste until soft peaks form. Top the middle of the pavlova with the whipped cream.
- Drizzle over some of the coulis, letting it drip down the sides gorily; if it is too thick then you can thin it with a little water. Serve the rest on the side in a jug for people to pour over.
- Scatter over the crushed Oreos then top with a pile of meringue bones and your favourite ghosts. Serve straight away and keep any leftovers refrigerated.

Sum
I don't like pavlova per se, but the characters (artwork) is so sweet (excuse the pun!) that I had to leave a comment 😀
Sally
This is brilliant Hannah
Mindy Fewless
I dont know whats better...how good it looks or how good it tastes!!
Ginny
Hahaha! What a great idea to turn a classic into a fun holiday treat!
Chris
This is one of the most creative Halloween recipes I've seen to date! WOW! Love that you've used Oreo (my all time fav) my sweet tooth is tingling 🙂
Jane
So, unbelievably, cute! I love them!
Helen at Casa Costello
I love the little expressions on the little ghosts faces - just too cute!
Michelle @ Greedy Gourmet
How cute! I've never attempted meringue before but this is a good excuse to lose my virginity in this regard.
Mariska
Hannah, you are indeed a master in baking, and you inspire me to take it to a whole other level. What a perfect Halloween recipe. How cute they look. My daughter loves them.
Kat (The Baking Explorer)
This is so impressive! I love how each ghost has a different face 🙂