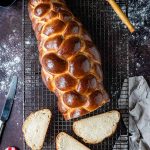
Vegan Challah Bread
Vegan challah bread – this vegan water challah is made without eggs but is still wonderfully soft, fluffy and flavourful. It is easy to make and you can shape it as you like or follow my step-by-step instructions to make a beautiful six strand braid. Recipe makes 1 large loaf or 2 smaller ones.
Servings 1 loaf
Ingredients
- 485 g (4 cups) white bread flour or plain (all-purpose) flour plus extra as needed
- 10 g (2 ½ tsp) fast action/instant yeast*
- 75 g (¼ cup + 2 Tbsp) caster (superfine) sugar**
- 1 ½ tsp salt
- 90 ml (6 Tbsp) oil (olive, sunflower, vegetable or canola)
- 260 ml (1 cup + 1 Tbsp + 1 tsp) warm water
Glaze:
- 1 Tbsp maple syrup
- 1 Tbsp water or non-dairy milk
Instructions
- Ideally you should start the day before you want to bake the bread. Or fairly early in the morning if you want to make it all in one day.
- Place the flour in a large bowl, or in the bowl of a stand mixer fitted with a dough hook. Add the yeast to one side and the sugar and salt to the other. Mix to combine.
- Add the oil and most of the water and stir to form a rough dough, adding the rest of the water as needed to bring it together.
- Knead the dough for about 10 minutes by hand on an unfloured surface, or for about 5 minutes in a stand mixer.
- After a bit of kneading the dough should become silky smooth and supple and should pull away from the worktop or sides of the bowl cleanly. It should be slightly tacky to the touch but not sticky. If it is too sticky then knead in more flour, a spoonful at a time until it reaches the desired texture.
- Place the dough in a large lightly oiled bowl and cover (I use a shower cap). At this point you have two choices; if you are baking the bread in the same day, let the dough rise in a warm place until doubled in size, about 2 - 2 ½ hours.
- If you are baking the bread the following day, let the dough rise at room temperature for 1 hour then place the bowl in the fridge to finish rising overnight.
- The following morning, or once the dough has doubled in size, punch it down. Now it is time to shape your challah; you can either find a tutorial for a shape you like, or follow my instructions (and step-by-step photos above) to make a six strand challah. You can make one large loaf or two smaller ones.
- To make a six strand challah, divide the dough into six even pieces. You want them to be as even as possible, I use a scale to make sure they are all the same weight. If you are making two smaller loaves rather than one big one, divide the dough in half first, then each half into six.
- Roll one of the pieces of dough out into a thin square, it doesn't need to be exactly square shaped. If the dough is sticking you can lightly oil the worksurface and rolling pin.
- Starting at whichever side is shortest, roll the dough up tightly into a sausage. Roll over the sausage with your hands, starting from the middle and working outwards, to form a long, thin strand. Increase the pressure from your hands at the ends to taper them. You want the ends to be pointy and the strand to be thicker in the middle.
- Repeat with the rest of the portions of dough, making sure that all of the strands are the same length.
- On a lightly floured surface, arrange the six strands parallel to each other. At one end, gather the tips of the strands together and pinch them tightly so they stick together.
- To make a six strand braid you just have to follow four repeating moves. First, take the second from the right strand and move it over to the far left. Then, take the far right strand and move it over two strands to the middle (spread the strands apart if needed to make room). (The middle is in the centre of the four strands, not including the strand you just moved to the far left.)
- Then, take the second from the left strand and move it over to the far right, then move the far left strand over two to the middle.
- Repeat these four moves - second right to far left, far right to middle, second left to far right, far left to middle. Carry on going until you have braided the whole loaf then pinch the end together and tuck any stray bits underneath.
- If the loaf is too long and thin, you can use your hands to lift and compact it a bit to make it shorter and fatter.
- Place the loaf on a baking sheet lined with baking parchment and repeat the steps above if you are making two loaves.
- Loosely cover the loaf(ves) and set aside in a warm place to rise until they are about doubled in size, 1 - 3 ½ hours depending on how warm it is. The bread is ready to bake when when it has visibly almost doubled in size and if you gently poke it with a finger it springs back slowly most of the way but leaves a small indentation. If it springs back quickly and fills in completely then it isn’t ready yet.
- While the challah are rising make the glaze - mix together the maple syrup and water or milk in a small bowl and set aside. Preheat the oven to 180°C/350°F/gas mark 4.
- When the challah is ready to bake, gently brush it all over with some of the glaze. Bake for 20 minutes then brush with more glaze (if you want to sprinkle it with sesame or poppy seeds do it now) and return to the oven for 15 minutes for a large loaf, or 10 minutes for two smaller ones.
- The best way to tell when a loaf of bread is cooked through is to use a probe thermometer, it should reach 94°C/201°F when poked into the middle of the loaf.
- Slide the baked challah onto a wire rack and leave to cool before slicing.
Notes
- For the best results make sure that you follow the recipe closely. As always, I highly recommend using the gram measurements (with a digital scale), rather than the cup conversions. Cup measurements are simply not accurate enough for baking and I cannot guarantee the best results if you use them.
- *If you only have active dried yeast then you can still use it, but you will need to mix it with some of the warm water and a pinch of the sugar first. Let it sit for 10-20 minutes until it has become bubbly then proceed with the rest of the recipe as written.
- **You can reduce the amount of sugar if you want a more savoury challah (keep a Tbsp or two to feed the yeast). The dough may rise more quickly with less sugar so keep an eye on it.
- The glaze does become a bit sticky after a few hours at room temperature so if you prefer you can brush the bread with milk or aquafaba instead; it won’t be shiny in this case however.