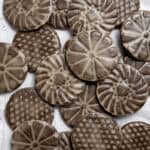
Vegan Glazed Gingerbread Cookies
These beautiful stamped gingerbread cookies are made with a soft baked chocolate gingerbread dough and topped with a cinnamon rum glaze to highlight their pretty patterns.
Servings 18 cookies
Equipment
- cookie stamps (optional)
Ingredients
Cookies:
- 90 g (6 Tablespoons) vegan block butter softened
- 100 g (5 Tablespoons) black treacle or molasses
- 90 g (⅓ cup + 2 Tablespoons) dark brown soft sugar
- 15 g (1 Tablespoon) non-dairy milk (I use soy)
- 20 g (2 packed Tablespoons) cornflour (cornstarch)
- 8 g (1 Tablespoon) Dutch processed cocoa powder
- ½ teaspoon bicarbonate of soda (baking soda)
- ¼ teaspoon salt
- 1 ¼ teaspoons ground ginger
- ½ teaspoon ground cinnamon
- ⅛ teaspoon ground cloves
- ¼ teaspoon black pepper
- 240 g (2 cups) plain (all-purpose) flour
Glaze:
- 80 g (¾ cup) icing (powdered) sugar
- 15 g (1 Tablespoon) vegan butter melted
- 1 Tablespoon dark rum (or lemon juice)
- ⅛ teaspoon cinnamon
- 1 teaspoon hot water
Instructions
- Whisk together the butter, treacle and brown sugar with an electric mixer until well combined. Make sure to scrape the base of the bowl to incorporate any treacle that has stuck to the bottom.90 g (6 Tablespoons) vegan block butter, 90 g (⅓ cup + 2 Tablespoons) dark brown soft sugar, 100 g (5 Tablespoons) black treacle or molasses
- Whisk in the milk, cornflour, cocoa powder, bicarbonate of soda, salt, ginger, cinnamon, cloves and pepper.15 g (1 Tablespoon) non-dairy milk (I use soy), 20 g (2 packed Tablespoons) cornflour (cornstarch), 8 g (1 Tablespoon) Dutch processed cocoa powder, ½ teaspoon bicarbonate of soda (baking soda), ¼ teaspoon salt, 1 ¼ teaspoons ground ginger, ½ teaspoon ground cinnamon, ⅛ teaspoon ground cloves, ¼ teaspoon black pepper
- Add the flour and mix to form a smooth dough with no dry patches. Shape into a disc, wrap and refrigerate for 1 hour until firm enough to roll out. Place the cookie stamps in the freezer to chill and line 2 baking sheets with baking paper.240 g (2 cups) plain (all-purpose) flour
- Roll out the dough on a floured surface to 6-8mm thick, depending on how thick you want your cookies to be.
- Dust the chilled cookie stamps with flour, tapping out any excess, and press the cookie stamps into the dough applying a firm even pressure. Be careful not to press them too hard however, you don't want to go all the way through the dough, about ⅓rd of the way through is perfect.
- Either use a cookie cutter the same size or slightly larger than the stamp to cut out the cookies, or use a sharp knife to cut round the cookie stamp after pressing it into the dough.
- Place the cut out cookies spaced apart on the lined baking sheets. Knead together the scraps, re-roll and cut out more cookies. Place the trays of cookies in the fridge to chill for at least 15 minutes while you preheat the oven to 190℃/170℃ fan/375℉/gas mark 5.
- Bake the chilled cookies for 10 minutes. They will still be quite soft but will firm up a bit as they cool. If you prefer crunchy rather than soft gingerbread then you can bake them for a little longer.
- While the cookies are baking make the glaze - sift the icing sugar into a bowl and stir in the melted butter, rum, cinnamon and hot water. Add a tiny drop more hot water if needed to make it the consistency of runny honey.80 g (¾ cup) icing (powdered) sugar, 15 g (1 Tablespoon) vegan butter, 1 Tablespoon dark rum , ⅛ teaspoon cinnamon, 1 teaspoon hot water
- Remove the baked cookies from the oven and allow to cool for 5 minutes on the tray.
- Use a pastry brush to brush a thin layer of the glaze over the cookies, making sure that it gets into all the details of the design. Place the glazed cookies on a wire cooling rack and leave to set for about 30 minutes.
Notes
- See post above for tips, details, storage instructions and step-by-step photos.
- As with all of my baking recipes I really do recommend using the metric measurements with a digital scale rather than the cup conversions. Cups are a wildly inaccurate measuring system and you will get far better, more consistent results using a scale, not to mention that it is also easier and less messy than cups!