

For the month of January Jelena from A Kingdom for a Cake invited us to start this year with a dreamy celebration cake. She challenged us to make the Esterhazy cake a.k.a the Hungarian dream. What better way to start the year than with a sweet dream?

This months daring bakers challenge was an Esterhazy torte - a rich Hungarian cake comprised of five layers of toasted hazelnut dacquoise filled with a hazelnut buttercream made with egg yolks which is traditionally topped with glace icing and a chocolate cobweb pattern. I decided to change things up a little bit and add some chocolate, because why have a plain hazelnut cake when you can have a chocolate hazelnut cake...?! And I am very glad I did change the recipe because the cake ended up tasting like a giant Ferrero Rocher! So this isn't a traditional Esterhazy recipe, but it is delicious!

Instead of the hazelnut buttercream filling, I made chocolate and hazelnut praline creme patisserie, which tasted amazing, a lot like nutella. I could seriously just have eaten a bowlful of it, and it paired perfectly with the dacquoise layers, it all melds together and the whole cake becomes soft, gooey and utterly delicious. There are quite a few steps involved to make this cake but it can be prepared over two days if you prefer (I did it all in one go because maybe I'm a masochist...), you can toast the nuts (don't skip this step, it really brings out the flavour), make the praline and creme patisserie and bake the dacquoise one day and then assemble and ice it the next (you can skip the icing and chocolate decoration on the top completely if you wish, and simply spread some of the creme patisserie over the top as well as the sides of the cake - the icing is mainly for decorative purposes and I didn't feel that it added anything flavorwise to the cake.). If refrigerated it will keep well for a good few days, I haven't been able to resist slicing a slither off to nibble on every time I open the fridge door...

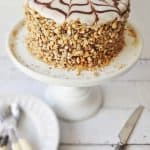
Esterhazy Torte (Hazelnut & Chocolate Layer Cake)
Ingredients
Chocolate hazelnut praline creme patisserie
- 500 ml (2 cups + 1 tablespoon + 1 tsp) full fat milk
- 1 teaspoon vanilla extract
- 6 egg yolks
- 100 g (½ cup) caster (superfine) sugar
- 40 g (⅓ cup) plain flour
- 40 g (⅓ cup) cocoa powder
- 50 g (2 oz) dark chocolate, chopped
- 75 g (2.5 oz) hazelnuts
- 75 g (⅓ cup + 1 tbsp) caster (superfine) sugar
- ½ teaspoon oil
Hazelnut Dacquoise
- 125 g (4.5 oz) hazelnuts
- 6 egg whites
- 135 g (⅔ cup + 1 tsp) caster (superfine) sugar
- 1 teaspoon vanilla extract
- 40 g (⅓ cup) plain flour, sifted
Decoration
- 1 heaped tablespoon apricot jam
- 25 g (1 oz) dark chocolate
- ½ teaspoon sunflower oil
- 150 g (1 + ½ cups) icing (powdered) sugar, sifted
- 1 teaspoon sunflower oil
- 2 teaspoon lemon juice
- hot water
- 100 g (3.5 oz) hazelnuts, coarsely chopped
Instructions
- Tip all of the hazelnuts onto a baking tray large enough for them to lay in a single layer, place the tray into a cold oven, then turn the heat on to 180C/350F/gas mark 4. Roast the nuts until the skins have turned dark, they smell toasty and the inside has become a light caramel colour, about 15-25 minutes. Keep a close eye on them as they burn easily.
- Once the nuts are toasted, tip them straight from the oven onto a clean tea towel, wrap them up in the towel and rub them together, the skin should flake off, don't worry if you are unable to remove all of the skin. Set aside until cool.
- To make the creme patisserie, line a shallow tray with greaseproof paper. Heat the milk and vanilla extract till boiling, meanwhile, whisk the egg yolks and sugar together until thick and pale then sift in the flour and cocoa powder and whisk until smooth.
- Gradually pour the hot milk into the egg yolk mixture, whisking the whole time. Pour this mixture through a fine mesh sieve into a clean pan.
- Bring up to the boil while whisking then turn the heat down to a simmer and cook for a few more minutes, whisking continuously, until the cream is really thick. Add the chopped chocolate and stir until it has melted. Scrape onto the lined tray, cover with clingfilm so that it is touching the surface (to prevent a skin from forming) and place in the fridge until cold.
- Make the praline: Line a small tray with greaseproof paper. Put the 75g of hazelnuts into a small, heavy bottomed saucepan with the 75g of caster sugar. Heat while stirring continuously until the sugar has melted and become a caramel colour; quickly tip the mixture onto the lined tray and leave until cool.
- Break the cooled praline up into pieces and place in a food processor with the oil. Blitz until it turns into a paste (like peanut butter) then place in the fridge until needed.
- To make the dacquoise, grind the 125g hazelnuts to a powder, be careful not to over-process them or it may become a paste.
- Heat the oven to 160°C/325°F/gas mark 3.
- Cut out 5 circles of greaseproof paper to line a 15cm/6in round tin (use two or three tins if you have them).
- Whisk the egg whites with an electric mixer in a large, very clean bowl until soft peaks form, then gradually whisk in the sugar, a little at a time, until the meringue is stiff and glossy.
- Carefully fold in the vanilla extract, ground hazelnuts and flour.
- Gently spread a 5th of the mixture into each of your lined tins, bake for 15 minutes. They will look soft but should not be sticky to the touch.
- Remove the layers from the tins, leaving the greaseproof paper on the bottom, and place them on a flat surface (not a wire rack). Quickly wash, dry and re-line your tins, spread more mixture in them and repeat the baking process until you have used all of the mixture and have 5 layers of dacquoise. Leave the layers on the flat surface until cool. You can leave them on the surface, covered with greaseproof paper or a clean tea towel overnight if you wish.
- To assemble the torte: Line your serving tray/cake stand with greaseproof paper.
- Place the creme patisserie into a bowl and beat with an electric whisk until smooth, beat in the praline paste, divide the patisserie into 5 equal portions.
- Remove the paper from the bottom of one of the cake layers and place it on your serving tray. Spread one portion of the creme patisserie over the dacquoise then top with another cake layer. Repeat, making sure that the last layer is placed bottom-side-up (do not place filling on this surface) which will make it easier to obtain a smooth looking finish.
- Press down gently on the top of the cake to level it out (you want the top to be as flat as possible).
- Warm the apricot jam until runny then brush a thin layer over the top of the torte, place in the fridge for about half an hour.
- Spread the remaining portion of creme patisserie around the sides (not the top) of the torte.
- Melt the chocolate and oil together, stir until smooth then place in a piping bag.
- Mix the icing sugar, oil and lemon juice together, stir in hot water, a teaspoon at a time until the mixture is creamy, but very thick, it shouldn't be runny at all.
- Spread the icing over the top of the torte using a hot, wet palette knife. Pipe four concentric circles of chocolate on top of the icing then use a skewer to run lines through the chocolate.
- Press the chopped nuts around the sides of the cake to finish.
- Keep refrigerated.
Notes
2. For the praline, hazelnut oil is ideal but you can use any nutty or flavourless oil you have.

I am sharing this with Foodie Fridays, Fiesta Friday, Foodie Friends Friday, Totally Talented Tuesdays, Create Link Inspire




Rachael A
Just looks stunning! Beautiful!
hannahhossack
Thank you!
liana
Wonderful cake! I'm sure the chocolate in the cream was a good idea, I plan to make it again, some day, with cocoa or coffee in the cream.
hannahhossack
Thank you 🙂 It really was utterly delicious!
Hilda
What a magnificent cake that is, and sure to be delicious. I like your idea of making a coffee cream too. This is a winning cake recipe!
hannahhossack
Thanks Hilda 🙂
Janine
This looks and sounds so decadent ! I love the combination of hazelnut and chocolate as well. May have to add this to my baking list =)
hannahhossack
It is utterly divine!
Ann
There is no sponge cake, right? I have seen many Hungarian dream recipe with sponge, wonder which to bake. Your creme sounds soo goood (definitely better that just buttercream) ❤️
Hannah
Hi Ann, yep, there's no sponge cake, just the hazelnut meringue layers.
petiteraisin
I saw this cake and drooled. Looks so amazing!! Can't wait to try it out and I hope the measurement conversion works! What a great challenge to be a part of. Everyone wins in the end...let there be cake for all!
Found ya through Tasty Tuesday!
.:Marta:.
http://petiteraisin.ca
hannahhossack
Thank you! There shouldn't be any problems with the measurement conversion, I just put that note there because as I bake using grams rather than cups I cant be 100% certain it is accurate, any minor discrepancies shouldn't cause an issue 🙂
Carrie Zinnecker
So lovely! The idea of a nutella-like filling sounds incredible. Your photos are amazing.
hannahhossack
Thank you! It was one of the most delicious fillings I have ever made 🙂
Laura
Oh. My. Goodness. The cake as a whole - wow. But I don't think I'd even get that far. I'd be too busy eating the bowlful of that creme patissiere.
hannahhossack
:p I did have to restrain myself...
hannahhossack
Thank you 🙂 and thank you for the challenge, it was a really good one!
Laura @ Life with Baby Kicks
Inspired I love the look don't think I'm up to the challenge though x
lucyparissi
I am in love with your photos here! I think this one is going to be a Pinterest sensation. That cake stand – droooool. The cake double drooool! Your site is looking fabulous in general – so impressed! Thanks for linking to #CookBlogShare
hannahhossack
Thank you! I've been doing some tweaking to the site, got a few more improvements to make but it's definitely looking better! The cake stand is lovely isn't it, a Christmas present from my mum 🙂 x
Kirsty Hijacked By Twins
Wow this looks and sounds simply divine! Stunning pictures x #bakeoftheweek
hannahhossack
Thanks Kirsty 🙂
Lucy @ BakingQueen74
Looks amazing!
jociandi
Being a Hungarian, it is great to see that you made your own version of our favourite cake. If you would like to try an other traditional cake of ours, go for the Dobos torta with the crunchy caramel layer on the top.
hannahhossack
The Dobos torte is on my list of bakes to make, it looks amazing!
Beth @ Culinary Correspondence
Oh wow - I'm not sure YUM begins to cover how good this looks! Thanks for bringing so much deliciousness to the party 🙂
hannahhossack
Thank you!
Sue
Oh my word, I don't even know what to say, this cake is absolutely stunning! Amazing decorations and flourishes and no doubt it is beyond delicious as well! Wow!
hannahhossack
Thank you!It does taste amazing 🙂
Michelle @ Giraffes Can Bake
Wow this is amazing! I love chocolate and hazelnut (who doesn't?), I could eat up this whole cake!
chefjulianna
I'll be dreaming of this beauty for some time to come! What a stunning cake! 🙂
hannahhossack
Thanks Julianna 🙂
Nancy
Wow, Hannah... you've left me in awe... such a gorgeous cake! And the flavors?? Mmm... love the pairing of chocolate and hazelnut. 🙂 You're sure to please many FF party-goers for Part 2 of the Anniversary bonanza! Delicious!
Julie is HostessAtHeart
I liked that you went with 6 inch circles and added the chocolate filing. I wasn't sure how many changes were allowed with these challenges.
Beautiful job Hannah!
hannahhossack
Thank you Julie 🙂 I think that as long as you stick to the requirements that are listed above the recipe on the challenge page it's ok to do a little bit of tweaking, the full size cake would have been way too much for just the two of us!
Julie is HostessAtHeart
It was a lot! We shared it with guests and then my hubby and I worked on it for a week!
hannahhossack
I had to put some in the freezer!